On this step we will implement a pretty nice feature. Imagine you would like to add a hatch filling to your custom entity. We can take advantage of ObjectARX embedded object feature to implement this. There is a class called AcDbHatch which represents the AutoCAD hatch entity. This class can be used as an embedded object and we can use its worldDraw() method to draw our own hatch pattern. The first thing you need to do is to add an AcDbHatch member to our custom entity’s class. We will also declare the SetupHatch() method to setup the hatch properties. To do that, open the AuPolyline.h file, and place the following lines at the end of class declaration:
protected:
AcDbHatch m_Hatch;
public:
void SetupHatch();
Further, we will need to add 3 more methods to our entity to handle modifications. The first method will handle all graphic transformations. The 2 remaining methods will handle the STRETCH command:
public:
virtual Acad::ErrorStatus transformBy(const AcGeMatrix3d & xform);
virtual Acad::ErrorStatus getStretchPoints(
AcGePoint3dArray & stretchPoints) const;
virtual Acad::ErrorStatus moveStretchPointsAt(
const AcDbIntArray & indices, const AcGeVector3d & offset);
Our hatch object needs to be configured. To do this we will place, inside the custom entity’s constructor located at AuPolyline.cpp file, the following code (note that this configuration needs to be done only once so the constructor is the better place to put it):
AuPolyline::AuPolyline () : AcDbPolyline ()
{
m_Hatch.setNormal(AcGeVector3d::kZAxis);
m_Hatch.setElevation(this->elevation());
m_Hatch.setAssociative(true);
m_Hatch.setPatternScale(1.0);
m_Hatch.setPatternAngle(45.0);
m_Hatch.setHatchStyle(AcDbHatch::kNormal);
m_Hatch.setPattern(AcDbHatch::kPreDefined,_T("LINE"));
}
Now we need to add the SetupHatch() method implementation to build the hatch loop according to our polyline boundary. The code will be as follows:
void AuPolyline::SetupHatch()
{
assertWriteEnabled();
// Remove previous loop
for (int l=0; l<m_Hatch.numLoops(); l++)
m_Hatch.removeLoopAt(l);
// Insert the updated loop
AcGePoint2dArray vertexPts;
AcGeDoubleArray vertexBulges;
// Collect points and bulges
for(int i=0; i<numVerts(); i++) {
AcGePoint2d pt2d;
double bulge = 0.0;
this->getPointAt(i,pt2d);
this->getBulgeAt(i,bulge);
vertexPts.append(pt2d);
vertexBulges.append(bulge);
}
// Close the loop
vertexPts.append(vertexPts.first());
vertexBulges.append(vertexBulges.first());
m_Hatch.appendLoop(AcDbHatch::kDefault, vertexPts, vertexBulges);
// Refresh hatch
m_Hatch.evaluateHatch();
}
On line 22 we append the arrays to the hatch entity as one loop. The loop can be also a hole into the hatch surface but in this example our loop is AcDbHatch::kDefault. On line 24 we finish the hatch configuration process by calling the evaluateHatch() method which will generate the hatch itself.
We need to call the SetupHatch() method inside some of our methods. The first place is inside the dwgInFields(). Place a call to this method at the end of this method as follows:
Acad::ErrorStatus AuPolyline::dwgInFields (AcDbDwgFiler *pFiler)
{
[ some lines were not displayed for code brevity ]
// Setup hatch
SetupHatch();
return (pFiler->filerStatus ()) ;
}
Acad::ErrorStatus AuPolyline::moveGripPointsAt (
const AcDbVoidPtrArray &gripAppData,
const AcGeVector3d &offset, const int bitflags)
{
assertWriteEnabled () ;
for (int g=0; g<gripAppData.length(); g++)
{
// Get grip data back and see if it is our 0 Grip
int i = (int)gripAppData.at(g);
// If it is our grip, move the entire entity. If not, forward the call
if (i == 9999)
this->transformBy(offset);
else
{
AcDbCurve::moveGripPointsAt (gripAppData, offset, bitflags);
SetupHatch();
}
}
return (Acad::eOk);
}
Adesk::Boolean AuPolyline::worldDraw (AcGiWorldDraw *mode)
{
[ some lines were not displayed for code brevity ]
// =======================================================
// HATCH
m_Hatch.worldDraw(mode);
//------ Returning Adesk::kFalse here will force viewportDraw() call
return (Adesk::kTrue) ;
}
// -------------------------------------------------------------------------
Acad::ErrorStatus AuPolyline::transformBy(const AcGeMatrix3d & xform)
{
Acad::ErrorStatus retCode = AcDbPolyline::transformBy (xform) ;
m_Hatch.transformBy(xform);
return (retCode) ;
}
// -------------------------------------------------------------------------
Acad::ErrorStatus AuPolyline::getStretchPoints(AcGePoint3dArray & stretchPoints) const
{
AcDbIntArray osnapModes,geomIds;
return this->getGripPoints(stretchPoints,osnapModes,geomIds) ;
}
// -------------------------------------------------------------------------
Acad::ErrorStatus AuPolyline::moveStretchPointsAt(
const AcDbIntArray & indices,
const AcGeVector3d & offset)
{
Acad::ErrorStatus ret = AcDbPolyline::moveGripPointsAt (indices, offset);
SetupHatch();
return ret;
}
The second method on lines 09-13, getStretchPoints(), is responsible to return the points that are enabled to stretch the entity. In this case we would like to add all of our polyline vertexes. This method can reuse the getGripPoints() method which returns the same points we want.
The last method on lines 15-22, moveStretchPointsAt(), is responsible to apply the stretch transformation over the entity. We will also reuse the existing method moveGripPointsAt() because it does exactly what we need. Next we just need to call SetupHatch() again to ensure our hatch is updated with the new boundary resulting from the STRETCH command.
Before test our custom entity, we need to place a call to SetupHatch() just before to close the entity on its creation stage. Open the acrxEntryPoint.cpp file, of AuUserInterface project, and locate the AuUserInterface_MyCommand1() method. See the code below:
static void AuUserInterface_MyCommand1(void)
{
[ some lines were not displayed for code brevity ]
pL->SetupHatch();
pL->close();
}
Our AuPolyline entity is derived from AcDbPolyline, right? So do you expect that a specific polyline commands like PEDIT work with our entity? Yes, it works! Try to fire the PEDIT command and select our polyline. It will accept it and will allow you to change the AuPolyline as if it is a native AutoCAD Polyline. You can add new vertexes, remove existing, join new segments and even open the polyline (Figure 19). Great!
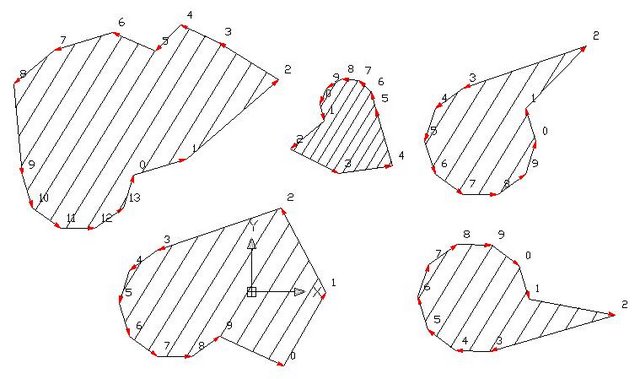
Figure 19 – AuPolyline modifications.
Conclusion
In this session you have learned how to create a custom entity and add some of the possible features ObjectARX allows. This is really only the tip of the iceberg. There are much more you can do using ObjectARX classes and implementing more sophisticated features. I really hope you have enjoyed this session and hope it may help you to make the startup into the ObjectARX world.
No comments :
Post a Comment